As someone in the IT profession, I have always wanted to build a home lab that I can practice in and improve my skills! Like so many before, I set out to find the cheapest, most effective way to accomplish this. My initial “lab”, as I called it, consisted of an old Linksys 10/100 router that I had laying around and Dell PowerEdge 2910 that I bought on eBay for $120. Not a bad start, I was able to play around with VMWare for a while and get my feet wet, but the server sounded like a wind tunnel and drew more power than a microwave!
From there, I started saving money, doing research, and talking to coworkers about they’re setups. I eventually came up with an idea of what I wanted, something that I could grow into and easily expand. Compared to others, what I have is very basic and entry level. The server, though old, still packs a punch and can run ESXi without issue! My main goal of this home lab is to get hands on experience with concepts that I’ve learned about through school and through work. So without further adieu, here’s my home lab in its current state!
Goal for this Home Lab
This purpose of building this home lab is to get hands on configuration and management experience working in the following areas:
- VMWare ESXi
- Ubiquiti Networks
- Windows Server 2016 Datacenter Edition
- Microsoft System Center
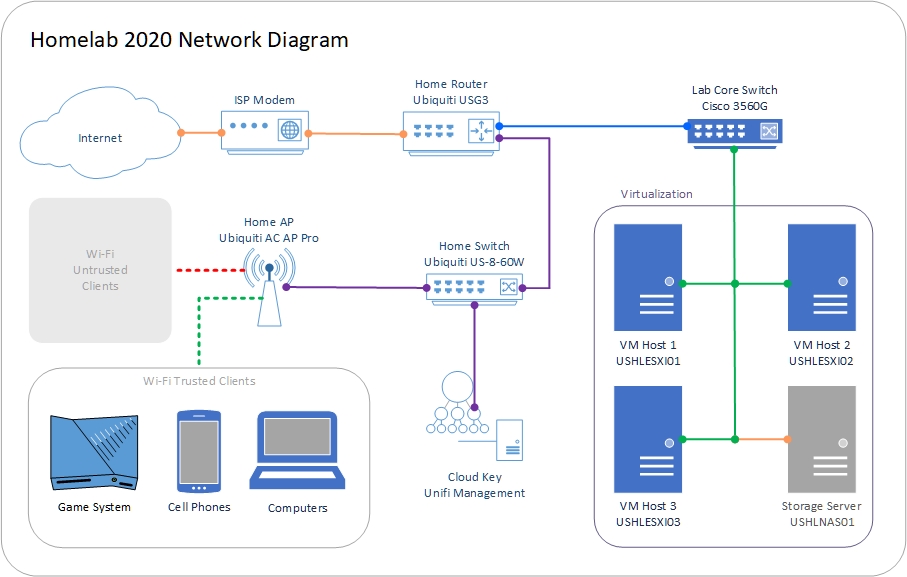
Network
- Ubiquiti Unifi Security Gateway (USG)
- Ubiquiti US-8-60W Unifi Switch
- Ubiquiti Unifi Cloud Key – Remote Control Device (UC-CK)
- Ubiquiti Networks Unifi PRO Access Point (UAP-AC-PRO-US)
- Various Cat6 Patch cables (6″ and 5′ lengths)
- Cable Matters 24-Port Keystone Patch Panel
- CAT6 Keystone Jacks (a few packs)
Power
Enclosure
- Navepoint 9U Rack Enclosure
- Navepoint 1U Blank Rack Spacer
- Raxxess RAX Unitray Universal Rack Tray UNS1
- Rackstuds Smart Rack Mounting System
Server
- SuperMicro X9SCL Motherboard
- SuperMicro CSE-512 Chassis (with 200w PSU)
- 16GB Sandisk USB 3.0
- 2 x 140GB Intel SSD
- 1 x 1TB Seagate HDD
- 4 x 8GB DDR3 1600 ECC UDIMM
- Intel Xeon E3-1230
- Corsair Dual SSD Mounting Bracket 3.5″
- Right-Angle AC Power Cord
- Right Angle VGA Male to Female
- Supermicro RSC-RR1U-E8 1U Riser Card
- Intel I350-T4 NIC
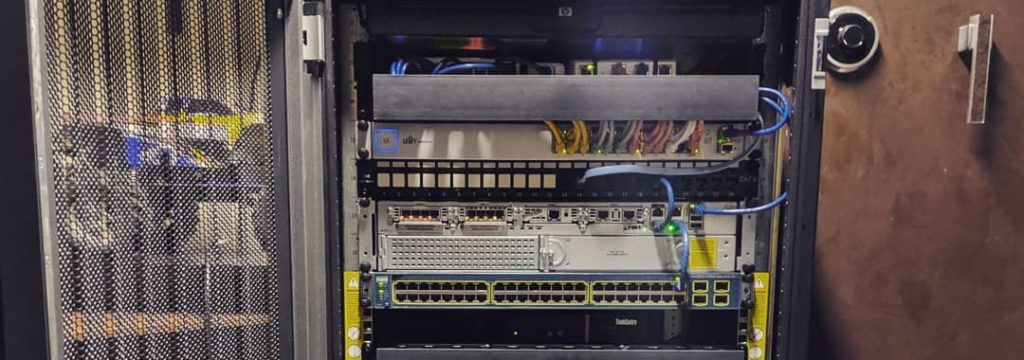
And here’s what all that looks like put together, my 2018 homelab!

As I said earlier, I built this lab as a starting point to expand upon. I’m already looking at ways to expand upon it, but I need some time to recoup the money I spent (there’s a reason I didn’t list prices…). The next items I would like to add are a larger, rack mount switch and a NAS, though I’m unsure if I’m going to build one or buy one. I’ll post a build log Home Lab Part 2 in the future, with more detailed pictures and diagrams.
Special thanks to Virtualex over at iThinkVirtual for helping me out and for posting amazingly detailed guides!
Let me know your thoughts / feedback in the comments! Every criticism helps!