Welcome back to the 2020 Homelab Overhaul series where we look at the design of the new lab and start sourcing parts! Apologies for the delay on this post, but I’ve recently accepted a new position and things have been quite hectic! Even though work has taken priority, progress is still being made in the lab. I’m going to need my lab for testing now more than ever!
In my previous post, 2020 Homelab: Planning Phase, I went over a few changes that I felt were necessary in order to facilitate expansion and my continued quest for knowledge! Below are a quick summary of those changes:
- Cisco 3560G as new core switch
- Ubiquiti gear will now be used for home networking instead of lab
- Set up Cisco lab for study
- Swap whitebox VM hosts for retired enterprise gear
- Find a new solution for NAS
Every item, with the exception of the Cisco lab, has been addressed in this article. Without further delay, let’s jump into what’s been going on!
Networking
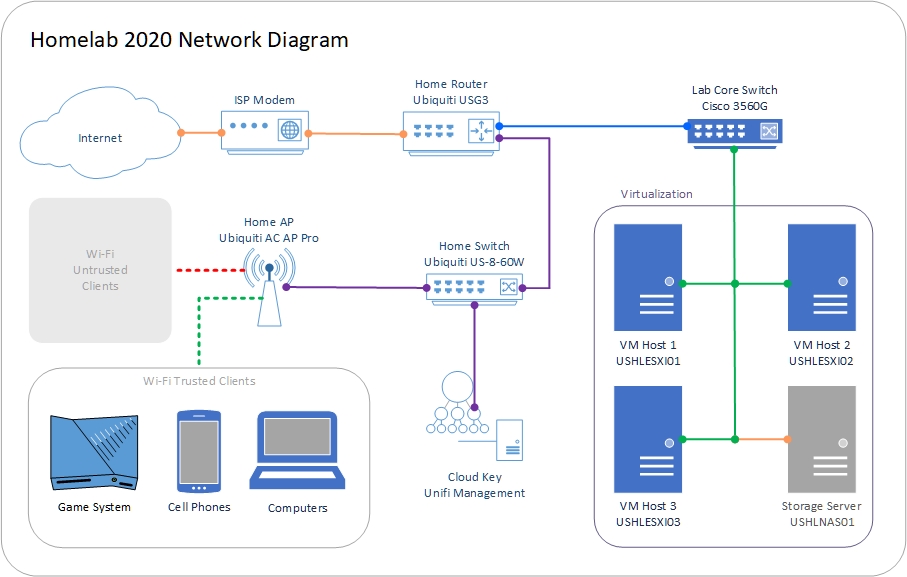
May I present you my network diagram! Unfortunately, I don’t have a diagram of my old network for comparison.

Color Key:
- Yellow – Unmanaged traffic from ISP
- Blue – 10.x.x.x network for lab traffic
- Purple – 192.168.2.x traffic for general traffic
- Green – Trunk with tagged traffic for VLAN 10, 20, 30, 31, 40, and 50
- Orange – LAG with VLAN 40 traffic
- Red Dashed – Untrusted wireless traffic
- Green Dashed – Trusted wireless traffic
I wanted to keep this diagram as simplistic as possible to alleviate clutter. As you can see, the Ubiquiti gear will be used for general home networking and the 3560G will now be the backbone of the lab. It will be responsible for handling all routing and switching for servers and other future gear.
The VLANs I’ll be using for Management, VMware, and Storage are as follows:
- VLAN 10
- Management
- 10.0.10.1/24
- Used for remote management (iDRAC, iLO, SNMP, etc)
- VLAN 20
- ESXi Management
- 10.0.20.1/24
- Used to access the management interface for VMware hosts
- VLAN 30
- Server Network
- 10.0.30.1/24
- Used for server VMs to segregate from other traffic
- VLAN 31
- Workstation Network
- 10.0.31.1/24
- Used for workstation VMs to segregate from other traffic
- VLAN 40
- Storage Traffic
- 10.0.40.1/24
- Used for accessing storage on NAS
- VLAN 50
- vMotion Traffic
- 10.0.50.1/24
- Used as a dedicated network for vMotion
I realize that these IP ranges may be overkill for a lab, but I wanted to keep it as simple as possible. It’s your lab, you can divide up your network any way you see fit! Just be sure to follow RFC 1918 for guidance on private IP subnets. If you assign a public IP to a device or router, you may cause havoc on your network.
Core Switch
The Cisco 3560G, mentioned above, is a 48 port PoE Layer 3 Managed switch which allows me to enable routing features and VLAN tagging! My main requirements were more gigabit ports, managed layer 3 capabilities, and it must have 48 ports for future connectivity. At the moment, I don’t have any PoE devices connected to the lab, but that may change in the future. This is a CLI only switch, which makes it a perfect platform to practice on. In a future post, I’ll cover a basic switch configuration and I’ll go through the process of translating the network map above into commands.

Servers
Storage
Time for the more exciting and drastic changes! To start, I want to figure out a rack mountable solution for my NAS and get away from my old desktop. There’s nothing wrong with a good old DIY NAS solution, but I wanted to get some remote management capability and some enterprise grade features that I didn’t already have. I had a few very good options:
- Try to expand current NAS and save money
- Use one of the old 1U VM hosts as a controller for a disk shelf
- Look into a retired SAN device and associated equipment
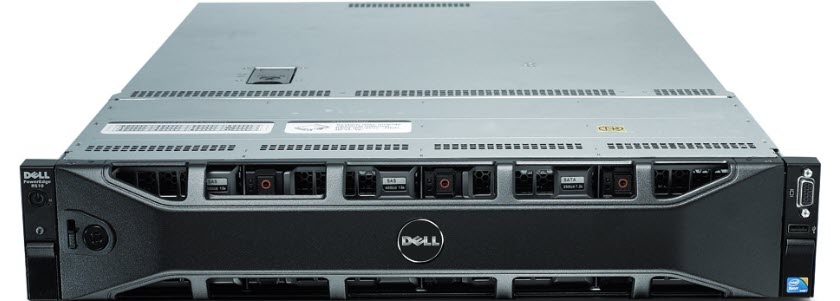
- Buy a retired 2U server with 12 LFF bays
While all of these options are great in their own right and have their benefits, the best option for me is a retired 2U server. After searching various threads online for a box that fits my requirements, I determined that a Dell R510 with a single processor, 16 to 32 GB of RAM, and 12 LFF drive bays. I managed to find a listing on eBay for $100 all in, a deal I couldn’t pass up!
Compute
Next, I mentioned that I want to consolidate down to one virtual machine host from three. Plans changed slightly, as a client happened to offer a deal on 3 HPE DL360p Gen8 servers! All three of the servers came with dual Intel Xeon 8 core / 16 thread CPUs, 144 GB of RAM, and 2 300 GB 10k SAS drives. I managed to pick all three for $300! I then went on eBay and found rail kits for $45 each and 900 GB 10k SAS drives for $25 each. All in, I spent $636 for 3 servers with a total of 48 cores / 96 threads, 432 GB of RAM, and close to 7 TB of storage. Not bad at all!

Where do we go from here?
Well, now that I have a plan in place and the hardware has been sourced, it’s time to implement the gear and get this lab up and running! The implementation phase will be broken down into several posts: Network Configuration, Rack and Stack, VMware Configuration, and finally NAS Configuration. In the next post, I’ll walk you through translating the network diagram into a switch configuration and how to test it! I am positive that it won’t take me another 3 months to get that post done. Thank you all for stopping by and I look forward to seeing you next time!