This year, 2019, has afforded me some fantastic opportunities both in my career and at home, so I wanted to take this time to overhaul my homelab infrastructure! That means I will have to plan, design, and implement the project over the next few months in hopes to have everything running by the new year. Starting October 1st, I’ll have 3 full months to complete the three stages of this project: planning, design, and implementation. I’ll be looking at new or different equipment for Networking, Virtualization, and Storage, and I may be adding some power management devices as well. This series will have 3 major updates, 1 per month for each stage, as well as some smaller ones to cover topics that are relevant that will hopefully be on a weekly basis. First things first, let’s go over the stages of this project!
Stage 1: Planning
With the introductions out of the way, let’s jump in to see what’s involved. The first part of the project will be to evaluate my current equipment, identify problem areas, and research components to replace it. A few goals that I want to keep in mind are expandability, simplicity, and compute to power consumption ratio. Why do I want to completely redo my lab when I have a perfectly good setup? My current lab feels a bit limited; I don’t have as much room to grow without adding more servers, which then drives up the power consumption and overall cost. I’d like to look for newer hardware that has similar power requirements that also packs a punch! Since I work in the IT industry, I would like to look into retired enterprise gear to get some hands-on experience. It will certainly be interesting comparing the various server models and networking equipment, there are so many options to choose from!
Stage 2: Design
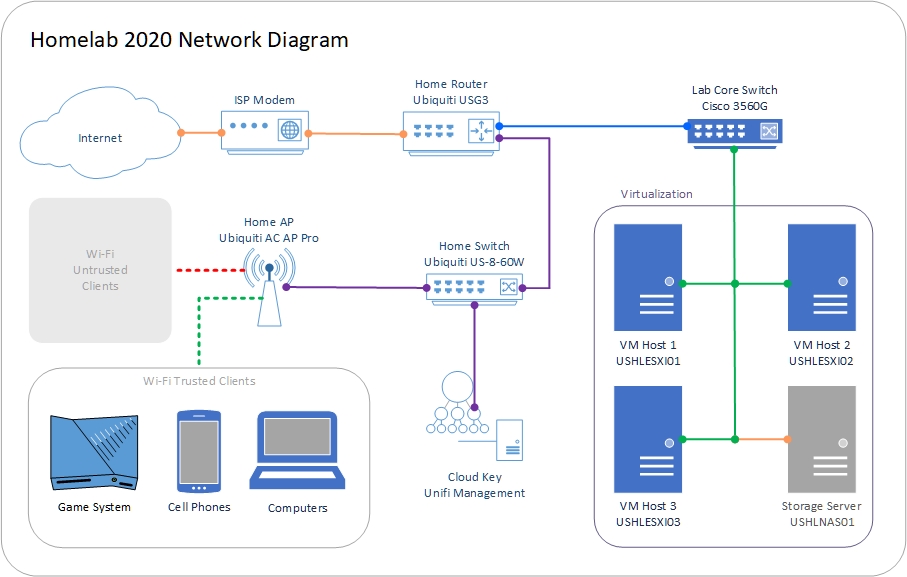
Once the initial planning is finished, I can begin creating infrastructure diagrams and sourcing hardware. It’s key to have a roadmap in place to reference, just in case things don’t go as planned! You may run into issues with compatibility between devices, or even run out of rack space. In either case, having diagrams can allow you to change your hardware configuration before you spend your hard earned money on equipment. After the requirements and planning are sorted out, the hardware can be sourced. I primarily use eBay, though I do order small items (such as cables) from Amazon. Since my place of work has a ton of retired equipment, I may see if I can purchase from them as well. It also lets them know that I intend to experiment at home, which could score you some brownie points!
Stage 3: Implementation
Now onto the best part, implementation and deployment! After all of your preparation, this is where the planning and design phases finally pay off! Getting the new network configured first will ensure a smooth cut-over and will decrease a need for major changes down the road once the rest of the hardware is live. Next, I’ll implement the storage solution. Migrating the data to a new server poses a great risk, so this will need to be handled with a lot of thought. That’s why the planning and design phases are crucial. The final step, for now at least, will be building a new virtualization host. Once the hardware is acquired, the configuration should be relatively easy. If I see fit, I may also add a new metered and switched power distribution unit to keep an eye on power consumption. It all depends on what kind of eBay deals I can find. Once all three areas are live, I can begin testing!
Parting Thoughts
I’m so excited and I can’t wait to begin this endeavor! This will truly test my skills as an IT professional and I eagerly anticipate the end result! I plan to update this series each step of the way, through the highs and lows, to document as much as I possibly can. I also plan to make posts about some of the tests I run and environments I configure. If there is enough content, I may make a video series to compliment my blog posts. If that is the case, I’ll be sure to update all of my posts with links to the videos. I hope to look back on this series in a few years and compare my skills (and maybe do another overhaul), just to see how far I’ve progressed with time. Thank you all for taking the time to read this post, the beginning of my journey, and I hope to see you all on the other side!